
Git Stash
If you need to switch branches while working on an unfinished part of your project, but don't want to commit incomplete work, you can use the git stash command to temporarily save your changes and switch branches without committing.
The figure below illustrates the properties and function of stashing in relation to the repository and working directory.

In general, "stash" means to securely store something in a hidden place. In Git, the term carries the same meaning, as it temporarily saves your changes safely without committing them.
Stashing allows you to temporarily save the messy state of your working directory for later use. Git stash provides various options, with some useful ones listed below:
- Git stash
- Git stash save
- Git stash list
- Git stash apply
- Git stash changes
- Git stash pop
- Git stash drop
- Git stash clear
- Git stash branch
Stashing Work
Let's explore this with a real-world scenario. I've made changes to two files in my project GitExample2, across two different branches. Since my work is incomplete and things are a bit messy, I want to temporarily save these changes for future use. We can stash the current state of the project. First, let's check the current status of the repository by running the git status command. The git status command is used as follows:
Syntax:
$ git status
Output:
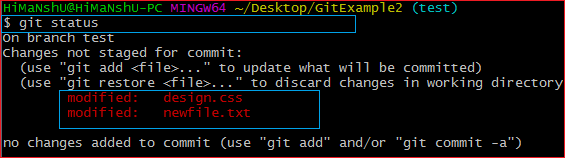
The output shows that two untracked files, design.css and newfile.txt, are present in the repository. To temporarily save these changes, you can use the git stash command as follows:
Syntax:
$ git stash
Output:

In the provided output, the work has been saved using the git stash command. We can now check the repository's status.

As you can see, my work has been stashed and the directory is now clean. You can now switch between branches and continue working on them.
Git Stash Save (Saving Stashes with the message)
In Git, you can stash changes with an associated message. To do this, use the following command:
Syntax:
$ git stash save "<Stashing Message>"
Output:

The stash created with the above command will be saved with the provided message.
Git Stash List (Check the Stored Stashes)
To view the stored stashes, run the following command:
Syntax:
$ git stash list
Output:

In this case, I've created one stash, which appears as "stash@{0}: WIP on test: 0a1a475 CSS file".
If there are multiple stashes, they will be displayed with different stash IDs. For example, see the output below:

It will display all the stashes with indices like stash@{0}, stash@{1}, and so on.
Git Stash Apply
To re-apply the changes you stashed, use the git stash command with the apply option. It is executed as follows:
Syntax:
$ git stash apply
Output:
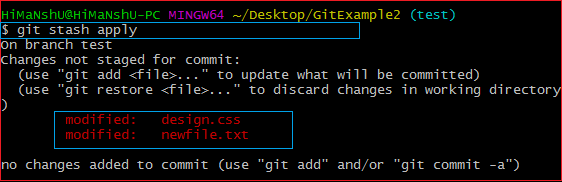
The output above restores the most recent stash. If you check the repository status now, it will show the changes that were applied to the files.
Output:
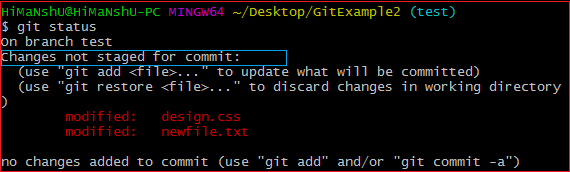
The output above shows that the repository has been restored to its state before the stash, with changes now listed as "Changes not staged for commit."
If you have multiple stashes, you can use the `git stash apply` command followed by the specific stash index ID to apply a particular stash. It is used as follows:
Syntax:
$ git stash apply <stash id>
Output:
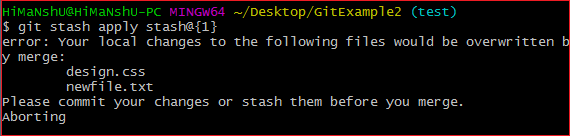
If you don't specify a stash, Git will apply the most recent stash by default.
Git Stash Changes
You can track stashes and their changes. To view the differences in a file before and after the stash operation, use the following command:
Syntax:
$ git stash show
The command above will display the stashed file and the changes made to it.
Output:

The output above shows that two files were stashed, with two insertions made to them.
To accurately track the changes made to a file, use the following command to display the modified content:
Syntax:
$ git stash show-p
Here, '-p' stands for partial stash. The command will display the edited files and their content.
Output:
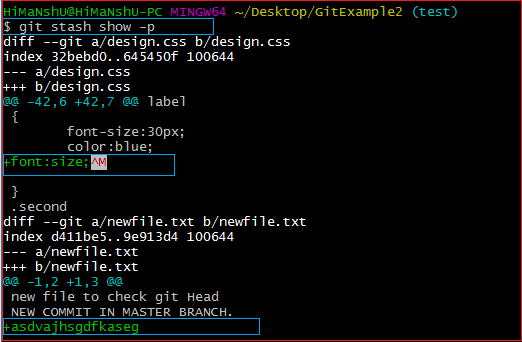
The output above shows the file name along with the changed content, similar to the 'git diff ' command. The 'git diff ' command will also display the exact changes.
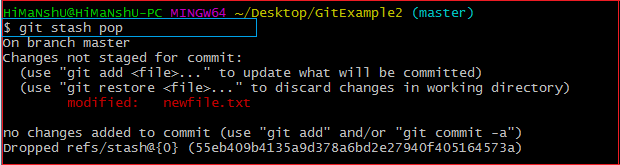
Git Stash Pop (Reapplying Stashes Changes)
Git lets you re-apply previous stashes using the 'git stash pop' command. This command removes the changes from the stash and applies them to your working directory.
The 'git stash pop' command is similar to 'git stash apply', but the key difference is that 'git stash pop' removes the stash from the stack after applying it.
Syntax:
$ git stash pop
The command above will re-apply the previous stashed changes to the repository.
Output:
Git Stash Drop (Unstash)
The 'git stash drop' command is used to remove a stash from the queue, typically deleting the most recent one. Be cautious when using this command, as it is difficult to undo once the stash is removed.
The only way to recover the stash is if you haven't closed the terminal after deleting it. The 'git stash drop' command is used as follows:
Syntax:
$ git stash drop
Output:
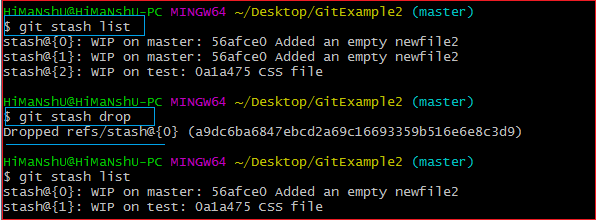
In the output above, the most recent stash (stash@{0}) has been removed from the three stashes. The 'git stash list' command will display all the remaining stashes in the queue.
You can also delete a specific stash from the queue by providing its stash ID with the 'git stash drop' command. It is executed as follows:
Syntax:
$ git stash < drop stash id >
If you have two stashes and you want to delete the older one without affecting the most recent stash, you can operate as follows:
$ git stash drop stash@{1}
Output:

In the output above, the stash with ID stash@{1} has been removed from the queue.
Git Stash Clear
The 'git stash clear' command deletes all stashes at once. To remove all available stashes, use the following command:
Syntax:
$ git stash clear
it will delete all the stashes that exist in the repository.
Output:
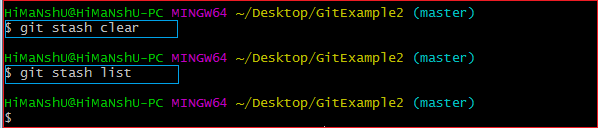
In the output above, all stashes have been deleted. The 'git stash list' command returns blank because there are no stashes remaining in the repository.
Git Stash Branch
If you stash work on a particular branch and continue working on that same branch, you might encounter conflicts when merging. Therefore, it’s advisable to stash your work on a separate branch.
The 'git stash branch' command lets you stash your work on a separate branch to avoid conflicts. The syntax for this command is as follows:
Syntax:
$ git stash branch <Branch Name>
Output:
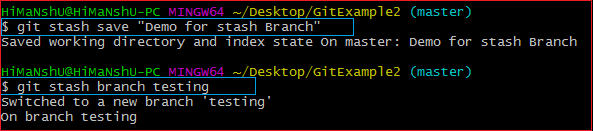
In the output above, the stashed work is transferred to a newly created branch named 'testing', which helps avoid merge conflicts on the master branch.